Monthly Archives: June 2018
Soil Moisture 6-21-18
Grateful to receive rain to help the first and second foot profiles at these locations! Interesting how after 2-3″ of rain on June 20th that the county roads were already dusty and I could drive the dirt lanes in these fields the next day. I will add York, Seward, and Clay soil moisture in my next post.

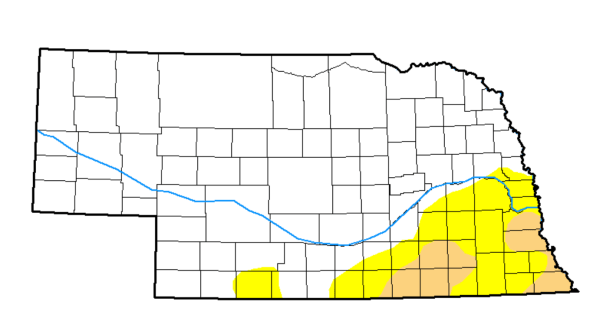
As of 6/19/18, drought had expanded in Nebraska with 15.4% being abnormally dry (yellow) and 7.4% being in moderate drought (tan). I installed soil moisture sensors in Clay, York, and Seward counties as well for future updates and groundtruthing.
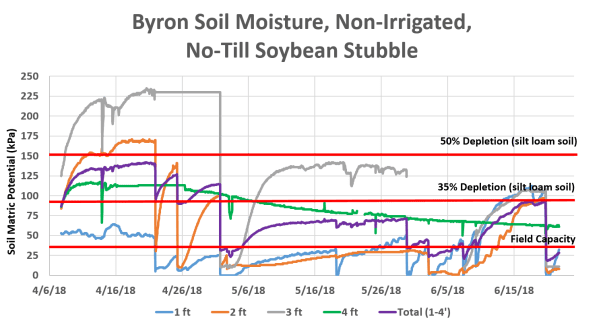
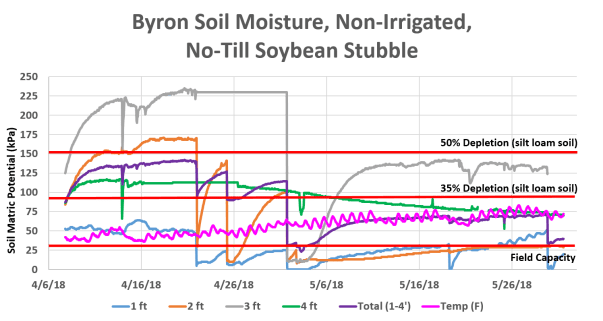
I’m unsure why the third foot keeps rewetting at this location unless there’s old root channels deeper in the profile allowing rain to re-wet around the sensors. Probing this soil, there’s moisture in the top two feet but profile is hard and dry beyond 2.5′. Corn is V10 at this location.

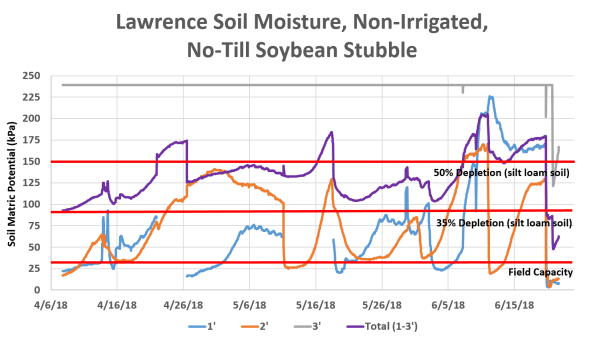
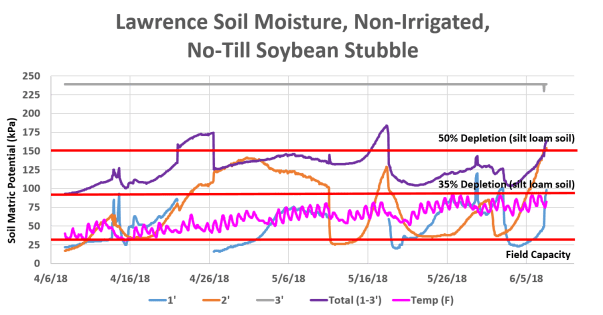
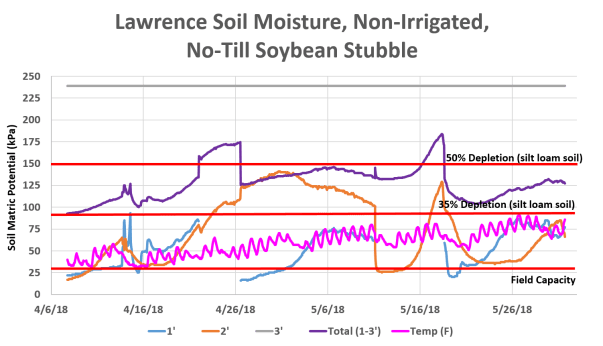
This location received 2.5″ of moisture which was a blessing! Probing the soil, the top 2.25′ of soil re-wet but it was dry and hard below that. Soybeans in this field are at R1.
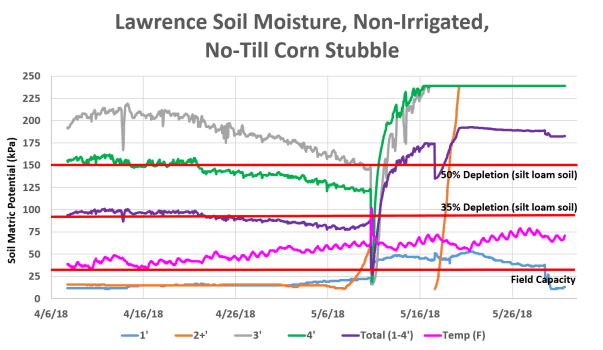
This location received 2.5″ of moisture which was a blessing! Probing the soil, the top 2.25′ of soil re-wet but it was dry and hard below that. The third foot profile shows up as responding to this rain event but most likely was a quick blip as it can be seen increasing at the end of the chart. Corn in this field is at V7-8.

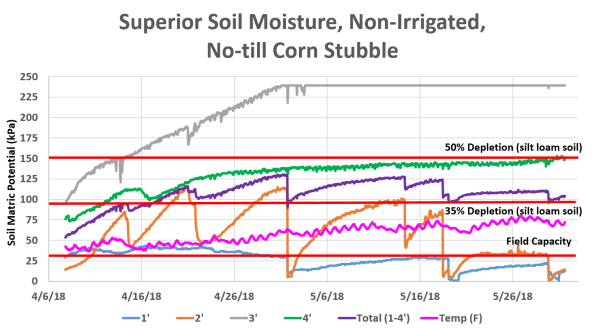
This site received 0.20″ June 8; 0.70″ on June 17; 3.30″ on June 20 which was a blessing! Probing this location, the top 2.5′ truly re-wetted with the profile hard and dry beyond that. Corn at this location is V8.
JenREES 6-24-18
Crop Update: What a blessing to have rain this past week! Grateful for how it provided much needed moisture into the top two feet in many cases. Updated soil moisture status will be at http://jenreesources.com. Some in our area and in other parts of the State received wind, hail damage, and flooding to crops. This week’s CropWatch at http://cropwatch.unl.edu shares information for those situations. A few summarizing points: for those with greensnap or with severe hail damage, you may wonder what potential yield may be based on your planting date and current plant stand. The following chart from Iowa State University and explanation of how to understand it may be helpful: https://crops.extension.iastate.edu/cropnews/2009/05/assessing-corn-stands-replanting.

Source: Iowa State University
For those with flooding, corn in the V7-10 leaf stage can survive for about 7-10 days in flooded water. Temperatures above 86F can result in greater stress on those plants than if the temps remain cooler than that during that time. Another consideration for the future, it’s not uncommon to find a disease called ‘crazy top’ of corn when the tassels begin to emerge. We’ve seen this the past several years where creeks or areas along waterways or field edges were ponded. There’s nothing you can do to prevent this.
For those with hail damage, damage from V7-10 leaf corn can result in a number of situations depending on the severity of hail. Minimal yield loss is assumed for leaf damage in crop insurance charts. Final plant stands will be important which will account for broken off plants that don’t recover. Stem bruising also isn’t factored in. For corn, bacterial diseases tend to be my larger concern at these growth stages. Bacterial top rot is one in which the plant dies from the top down and has a strong odor to it and creates a soft, slimy mess. Goss’ wilt is another concern-particularly systemic Goss’ wilt. You can check for this if you have a dying plant that doesn’t have a soft rot by taking a

Cross-section of stem showing systemic Goss’ wilt in the discolored vascular bundles.
cross section of the stem and looking for discoloration of the vascular bundles. You can also send plants like this to the Plant and Pest Diagnostic Lab in Lincoln for confirmation.
Regarding fungicide use on hail damaged corn, Iowa State and the University of Illinois did studies finding similar results. Both found no statistical difference in applying a fungicide vs. the untreated check in spite of small numerical differences. Regarding timing, the Iowa State study simulated hail damage at tassel and applied fungicide an average of 3 days and 8 days post-hail. There were no statistical differences on yield of the timing of the applications either. They did find statistically less fungal diseases in the hail-damaged plots vs. the non-hail damaged plots and speculated it was due to more air flow and less leaf area available for disease to occur. I have observed that fungicide can help with stalk strength and maintaining whatever green tissue remains when we had the 2013 hail storm in Clay County at brown-silk to blister corn. But this early, it’s hard to justify a fungicide application based on the data that’s available. If you’re interested in testing this for yourself, the following is an on-farm research Fungicide Protocol for Hailed Corn and Soybean.
For hail damage on soybean, many of the beans are at flowering or approaching flowering. Again, stem bruising isn’t counted in crop insurance assessments. I haven’t really observed bacterial or other disease issues necessarily from stem bruising in soybean. What tends to be more of an issue is those plants hardening off and becoming brittle to walk through. For soybeans, the blessing is that often new buds form and you will see increased branching which can help with canopy closure…it just can hurt right now when soybeans were already near canopy and we’re trying to reduce additional inputs for weed control. Things to consider are that pods may be closer to the ground from this increased branching and you may need to harvest earlier to help with getting beans that become brittle before snapping off in wind storms. I leave plant stands of near 60,000 plants/acre based on our soybean pop studies that received hail damage. If you want to prove any replanting differences to yourself, you may wish to consider the following Soybean Replant Protocol. We’d recommend waiting on herbicide apps till some new growth occurs, which is difficult when I’ve watched palmer essentially be not affected by hail and put on two new leaves within a few days in the past. Last year we started making herbicide apps 5-7 days post-hail. Additional hail resources are at a new resource called ‘Hail Know’ at: https://cropwatch.unl.edu/hailknow. There’s a lot of info I haven’t transferred to this site yet…but you can view photos and comments on hail recovery at numerous growth stages over time at my blog under the ‘Storm Damage’ category: https://jenreesources.com/category/storm-damage-2/.
Last week I shared the following video regarding determining timing of off-target dicamba movement to soybean: https://youtu.be/rQid7-vX-TU. Sharing again with an increase in the number of fields that were experiencing cupped symptoms last week.
JenREES 6-17-18
This past week contained many off-target herbicide concern calls. Prior to Memorial Day I had made a note that post-herbicide applications to corn began in much of the area and anticipated phone calls to begin in about two weeks. Most of the conversations this week were more FYI to let me know they had soybean leaf cupping.
Here’s a few things to consider if you are having soybean leaf cupping.
- First, was a post-herbicide application made to your soybeans? If so, check for any potential tank contamination (Check out this CropWatch article: https://go.unl.edu/fnig). If not, check out this publication (http://ipcm.wisc.edu/download/pubsPM/dicamba2004.pdf) to determine if any of the criteria mentioned could possibly be contributing to the problem.
- Determine how old the plant is by asking when the soybean was planted and even better when it emerged. A soybean plant will produce a new node every 3.75 days.
- To determine the timing of damage, I count the total number of nodes on the plant to the last trifoliolate where leaf edges are not touching. The total number of nodes may differ in different parts of the field such as irrigated and non-irrigated especially after herbicide damage and drought-stress (Example 8 nodes irrigated and 6 non-irrigated). Take the number of nodes X 3.75 to get total approximation of plant age. Then count back on the calendar to determine approximate emergence date. If I use 8 nodes in this example X 3.75 = around 30 days ago the plant emerged.
- I then count the number of nodes to the very first damage I see on leaves (Example 3). Multiply this number of nodes times 3.75 and count forward on the calendar from emergence to that date. For instance, in this case, damage occurred around 11 days after emergence.
- I also like to count how many completely unfurled trifoliolates are affected (Example 6 trifoliolates). Take that number and multiply by 3.75 (Example 6 X 3.75= approximately 23 days ago the damage occurred).
- In this example, it worked to count either direction (from emergence and from current date) to determine approximate timing of off-target movement occurring. In all the situations I’ve looked at thus far, the timing goes back to around Memorial Day with post-dicamba herbicide applications applied to corn.
- Auxin-like herbicides affect only cell division. Thus, fully developed leaves (no longer expanding via cell division) are not affected even though they may be expanding by leaf cell enlargement. Only the tips of the newest exposed soybean leaves may experience damage to dicamba as they are still undergoing cell division. Otherwise, it can take 7-14 days for leaf damage from dicamba injury to appear on susceptible plants and damage will occur typically 4-6 nodes. This is because dicamba is also translocated once inside leaf cells. Thus it impacts cell division of the leaf primordia at the stem apex. We may not even see those leaves yet because they are still enclosed in the stem apex tissue.
- In a matter of weeks, affected fields can go from appearing to have minor damage, to looking really bad, to growing out of damage. It looks worst when those affected nodes push upward giving the field a grayish/white cast to it as the leaves become much reduced in size and are tightly cupped. Eventually the leaves will begin to look more normal again in time (as long as a second off-target movement doesn’t occur).
What can you do? Water via irrigation and/or rainfall is the best recovery tool for dicamba damage. Waiting is another. We’re blessed to grow indeterminate soybean in Nebraska which continues to produce nodes and leaves upon flowering which allows our soybean to grow out of damage.
- Wait till harvest to determine any yield impacts if there are areas impacted vs. those which aren’t. Otherwise, field-scale damage is difficult to discern yield impacts.
- You can talk with your neighbors/ag retailers regarding what they sprayed. In our area of the State, it’s often difficult to pinpoint the source of off-target movement with so many applying dicamba products to corn for palmer control often around the same time-frame. Now that post-apps to soybean are also occurring, that may also become a challenge. Of all the fields I visited last year, less than a handful of farmers sought any sort of compensation and those were more often due to tank contamination issues. If you wish to pursue that route, you need to file a complaint with the Nebraska Department of Ag.
- For future dicamba applications, check out these best management tips: https://go.unl.edu/97ok.
- For those of you reading this in a source outside of my blog, I created a video to hopefully be more visual and clear on understanding this method of diagnosing timing. You can check it out at my YouTube site: https://www.youtube.com/user/jenreesources.
Bagworms: It’s June and one of my top questions has been “Have I found bagworms yet?” Well, they’re now feeding and forming new bags on junipers and spruces. What you’re looking for are not the old bags at this point, but very small (fingernail size) new bags that move as the caterpillar is feeding and making the larger bag. This video from Backyard Farmer (https://youtu.be/05A2quj9nO4) does a great job of showing various stages of bagworms and sharing on control methods. Check it out!
Irrigation Scheduling Workshops: Steve Melvin, Extension Educator in Hamilton/Merrick Counties asked I share about upcoming irrigation workshops hosted by UNL and Upper Big Blue NRD. The program will focus on installing the equipment and making irrigation scheduling decisions using the data generated by Watermark sensors. The workshops will be held from Noon-1:30 p.m. on June 25th at the Corner Café, 221 Main St in Stromsburg and also at the same time June 28th at the Hordville Community Building, 110 Main St. The Upper Big Blue NRD will provide the lunch. The first presentation will be Installation of Watermark Sensors and Data Logger presented by Dan Leininger, Water Conservationist with the Upper Big Blue NRD. The second will be Deciding When and How Much Water to Apply Using Watermark Sensor Readings presented by Steve Melvin. The irrigation scheduling strategies presented in Steve’s presentation can be used with any soil water monitoring equipment data. More information is available by calling Steve Melvin at (308) 946-3843 or visiting https://extension.unl.edu/statewide/merrick/.
Soil Moisture 6/7/18
Nebraska drought monitor map released 6/7/18. 18.1% of State is abnormally dry (yellow) with 5.4% of the State as moderate drought (tan).

Corn is at V7 in this field. The third foot sensor started reading strangely-very wet. The third foot profile is dry but sensor not showing it-thus the total soil moisture is not reflected as dry in this graph as it truly is. This location received 1.33 last week.

I had re-installed the 2 foot sensor in this field and it is showing how dry the second foot has quickly become. The same is seen across the road in the soybean stubble. 0.88″ was received at this location in the past week. Soybeans in this field were at V1 on 6/7/18. This farm family mentioned that first alfalfa cutting was 1/2 of normal this year.
Corn in this field was at V5 on 6/7/18. The soil profile in the top foot is drier compared to in the corn stubble across the road-which has been typical all year. Total soil moisture depletion in this field right now is around 50% for top three feet.

This location was blessed with some rain! 1.35″ was received 6/2/18 and another 0.50″ the morning of 6/7/18. The top two feet truly are muddy in this field when probing the soil but moisture runs out about 2.5 feet down into the profile. Corn was at V5 at this location on 6/7/18.
JenREES 6-10-18

Thank you to Tena with Faller Landscape in York and to all the youth who participated in our 4-H landscape design workshop and helped plant the Nebraska area! It will hopefully be beautiful for fair!
Crop Update: Rain continues to be spotty and windstorms have resulted in various levels of greensnap in some fields. Overall crops are growing and getting a decent canopy. It’s been interesting watching the radar on weather apps as so often they look like precipitation should be occurring yet that’s not always the case. Grateful for all of you who share crop updates-including things such as impacts on hay crops, pastures, etc. and for our farmers working with me on soil moisture monitoring. I was told this past week of the impact of our groundtruthing on the drought monitor; radar would make it appear we’re not as dry as we truly are. So just wanted to share that with you-that your input is important as we then share that input with those who work with the models and maps! I plan to get soil moisture sensors installed in non-irrigated fields in York, Seward, and Clay this week as well.
Soil Moisture Sensors Tips: With cultivating and hilling progressing, some are now looking at getting soil moisture sensors installed. If you utilize watermark sensors, the following are some tips I’ve learned.
Test sensors with wet/dry process to remove all air bubbles:

- First, make sure sensors read 199.
- Then, soak sensors for at least 24 hours. They should read 10 or less (Jenny’s note-I realize they may read this in a matter of minutes to hours but it’s our best practice recommendation to ensure all air bubbles are removed).
- If they don’t read 10 or less, gently rub any soil loose on them with your fingers (don’t use a brush) and allow to continue soaking for another 24-48 hours. If they still don’t read under 10, I don’t use them.
- Best practice is to then allow the sensors to completely dry out again to 199 to complete the wet/dry process. (Jenny’s note: I realize, due to time constraints, many sensors get installed once they have been soaking and never go through the complete drying process).
Installation:
- Avoid installing sensors in saturated soil conditions in clayey soils. Doing so allows a thin clay film to develop on the sensors which then affects readings .
- Prior to installation, the sensors should be soaked again and installed wet. The soaking process only takes a matter of minutes to get back to 10 or below. I carry the water bucket with sensors with me into the field.
- When soaking, water moves into the PVC pipe, thus it can take time for the water to drain providing accurate readings if not removed. Some sensors have a hole drilled in the PVC pipe above the sensor to allow water to drain. Otherwise, it’s important to remove the caps and tip the sensors over to dump any water that has accumulated in the PVC pipe during the soaking process. I then put the cap back on, take my hand and wet the PVC pipe with water so it pushes in easier. Some like to use WD-40 but my concern with that is it getting on the sensor affecting readings.
- Install all sensors where the sensor itself sets using an ag consultant tube (can be 12 or 18 inches). An ag consultant tube has a slightly smaller diameter that provides a tight fit for the sensor. Use a regular soil probe for the foot above that. For example, for 1’ sensor, I use ag consultant tube. For 2’ sensor, I use regular probe for first foot and ag consultant tube for second foot. For 3’ sensor, I use regular probe for first 2 feet and ag consultant tube for third foot. The reason for this is in clayey soils that are wet, there’s greater resistance to pushing in that sensor, so this is one way I’ve found which is easier for someone like me to push them in. (Jenny’s note: many have installed sensors with a regular soil probe through the years and that’s also fine. Just know that you may see more water run along side of tube before soil makes a tight fit around where sensor is located. I’ve just found less issues with this when I use the process described above).
- NEVER pour water into the hole or make a slurry. Make sure the sensor hits the bottom of the hole as air gaps can make the sensor readings inaccurate. Some people find it better to not remove the entire amount of soil for a specific depth and then push the sensor the rest of the way till the correct depth is obtained. I’m not always strong enough to do that so do what works for you as long as the sensor is at the correct depth and there’s no air gaps.
After Installation:
- Make sure to fill in any gaps around the sensor with soil and make sure there’s no soil cracks around the sensors.
- Make sure to mark each sensor and flag them well.
- Sensor readings should equilibrate with the soil within 48-72 hours but especially within a week.
- If a sensor starts reading really dry, before replacing it, I often remove it and reprime it in the field. This can be done by re-soaking in water for 1 minute or so till it goes back below 10 and then reinstalling in same hole. If it doesn’t go below 10, I replace it. If it reads strange the next week, I also replace it.
ET gages:
- A reminder to use distilled water in the tube and to fill the ceramic top when you’re also filling the main tube. I usually fill the ceramic top and wait for it to soak up a little then fill again.
- Prime the ET gage ensuring no air bubbles are in the second tube with the stopper. I always overfill the ET gage to help with priming and ensuring there’s no air bubbles.
- Excess water can be removed and also air bubbles can be removed by gently pulling down on the glass site gauge tube at the rubber base and releasing extra water from it. Air bubbles can also be released in this process. Place the site gauge tube back in place when you are at a water level between ‘0 and 1’. Then place one red marker ring on that beginning start level.
- I always plan to refill the ET gage when it gets down to ‘9’ on the site tube.
- The green canvas cover should be replaced at least every 2 years and be sure to dust it off and the white membrane below it.
In another column I’ll share how to use the two tools together for irrigation scheduling. All videos and charts with more information can be found at: https://water.unl.edu/category/nawmn. This is a checklist I made awhile back with Daryl Andersen which has more detail and could honestly be updated: http://www.littlebluenrd.org/pdf’s/forms/etgage_sensor_checklist.pdf but may also be helpful.
Tree Damage: Recent windstorms have caused for many downed branches and even some trees. When removing broken branches or dead branches, it’s important to prune correctly for tree health. Correct pruning of larger branches can often involve 3 cuts per limb. The first two cuts are made away from the trunk of the tree to remove most of the weight of the limb. The third cut is near the trunk itself at the bark collar ridge where the tree will eventually seek to heal. I like this Backyard Farmer YouTube video as a good visual of correct pruning: https://youtu.be/9cl0Qxm7npk. Pruning is best done in the dormant season of February and March. It’s best avoided in April and May when trees are putting energy into new leaves and in the fall as fall pruning can result in growth instead of the tree preparing for and going into dormancy. Some great resources with more information on proper pruning are: https://go.unl.edu/v9uf, https://go.unl.edu/gdb9, and this blog post https://jenreesources.com/2014/04/20/proper-tree-pruning.
Soil Moisture 5-31-18
So grateful to receive some rain across the area on May 29th!
This site received 0.78″ on May 29th. The rainfall briefly increased the moisture in the first foot soil profile until high winds the next few days started removing it again.
This site received 0.76″ on May 29 which also added moisture to the first foot briefly. I decided to re-install the 2′ sensor to give a more accurate indication of the soil moisture profile since it is deeper than 2′ in the last two weeks’ charts.
This site also received 0.76″ which very briefly added moisture to the first foot but began drying out again with the winds.
This site received 1.30″ of rain on May 29th which allowed for moisture in both the first and second foot soil profile.
JenREES 6-3-18
Crop Update: So grateful for some rain for much of the area last week! Updated soil moisture status at http://jenreesources.com. The crops are rapidly growing now as are the weeds. Some were seeing Palmer shooting heads at soil level already…last year we

Palmer shooting a head at the soil surface. Photo courtesy Matt Kirchhoff.
didn’t see that till late July. Many have been in the process of postemergence herbicide applications. We revisited a CropWatch article regarding best management practice considerations for postemergence dicamba-based applications to corn based on the research that is available. Please see the full article with more explanation at http://cropwatch.unl.edu. Briefly, those practices include:
- Consider a quick irrigation (rainfast/irrigation timing based on label requirements for the product you’re applying) of only 1000 gal/ac to help reduce any potential volatility.
- Don’t use dicamba products in both corn and soybean to reduce selection pressure and resistance.
- Check for temperature inversions and wind speed. Temperature inversions can be tested by using Innoquest SpotOn® inversion tester and testing the temperature at 1 meter and 3 meters. If the temp is cooler at 1 meter than 3 meters, a temperature inversion is occurring and spraying is not recommended.
- Consider using the more restrictive RUP dicamba requirements regarding wind speed, boom height, etc. Also consider not using AMS with any dicamba product even though it is labeled for use in some of the corn dicamba products. This may result in you needing to increase the glyphosate rate to the highest labeled rate to increase efficacy. Amit Jhala will showcase research on efficacy of dicamba products with and without AMS at the South Central Ag Lab Weed Science Field Day on June 27.
Volunteer corn is also a major issue in many corn and soybean fields in the area and there’s two articles in CropWatch at http://cropwatch.unl.edu addressing this topic. A number of grass herbicides are available for control in soybean. The challenge is in the continuous corn fields. If you had glyphosate resistant corn last year and used a different technology such as Liberty or Enlist, you have some other options this year. For Liberty Link corn this year, two applications, each of 32 to 43 fl oz/acre, could be made. Remember that Liberty will NOT be effective if Roundup Ready + Liberty Link hybrid corn was planted last year. Regarding Enlist corn, Assure® II is the only grass herbicide labeled to control volunteer corn with this technology. It can be applied at 5 to 12 fl oz/acre in Enlist Corn for selective control of volunteer corn. Please be sure to read and follow all label requirements. A few farmers have also discussed their past experiences with cultivation, using either one or two passes and their concern about the soil moisture situation this year.
So how much yield loss can be anticipated from volunteer corn? Perhaps more than one would think with more loss occurring in soybean! Studies were conducted in several mid-western states at various densities including 3500, 5000, 7000 and greater volunteer corn plants per acre. To envision this, imagine 3.5, 5, and 7 volunteer corn plants respectively in 1/1000 of an acre (17’5” in 30” rows). Some fields this year have much higher densities than this! Clumps of corn impact yield more than individual plants.
UNL research found a volunteer corn density of 3500 plants/acre led to 10% yield reduction in soybean. Doubling the density to 7000 plants/acre led to a 27% yield reduction. South Dakota State University data revealed similar trends. A volunteer corn density of 5000 plants/acre resulted in a 20% yield reduction (12 bu/acre yield loss in 60 bu/ac soybean).
Clumps of volunteer corn in soybean led to greater yield loss as they were more competitive than individual plants. In the UNL study a density of 3500 clumps of corn/acre resulted in a 40% yield reduction. Researchers in Minnesota and Illinois also found increased competition with clumps of volunteer corn versus individual plants. Clumps of corn (7-10 plants/clump) were established at different densities. Depending on the location and year, soybean yield was reduced 1% for every 75-115 clumps/acre.
A recent UNL research study found highest yield reduction occurred when volunteer corn was left uncontrolled or when it was controlled too late at the R2 (full flower) soybean growth stage. The combined density at this greatest yield reduction was at 24,710 volunteer corn plants per acre plus 1,235 volunteer corn clumps per acre.
In corn, UNL research found a volunteer corn population of 3500 plants/acre resulted in a 2% yield reduction in corn. Doubling the density to 7000 plants/acre caused a 5% yield reduction. Clumps of volunteer corn led to greater yield loss as they were more competitive than individual plants. A density of 7000 clumps of corn/acre resulted in a 14% yield loss compared to a 5% yield loss with individual plants. So volunteer corn in general can be fairly competitive especially to our legume crops. It can also be a problem regarding harboring corn rootworm in soybean fields, reducing the advantage of the rotation from that perspective.
Also, an update on my soybean planting date demo at the fairgrounds: I wasn’t counting on rabbits! All the soybeans were reduced to stems below the point of recovery. So there is no demo but the groundskeeper preferred they took out my soybeans instead of his petunias 🙂 Will try again next year.

