Category Archives: JenREES Columns
JenREES 7-8-18
Crop Update: A few diseases started showing up the past few weeks in various portions of eastern and south central Nebraska. Phytophthora root rot in soybean is perhaps the

Phytophthora root and stem rot in soybean. Notice wilted plant with leaves hanging on turning yellow/brown. Also notice characteristic brown lesion from base of plant up a good six inches on this plant. This affected plant is surrounded by healthy plants.
most common in both areas. We normally think of this disease as seedling damping off and death; however, it can also affect plants later in the season. What surprised me was how much we are seeing it this year in higher ground and sidehills instead of the typical lower ground we often see it on. Dr. Loren Giesler, Extension Soybean Pathologist said that in situations where we’ve had dry conditions followed by heavy rains (as we have this year), especially on clayey or soils prone to compaction, Phytophthora can also affect plants. He has a few videos along with additional information at the following website: https://go.unl.edu/tdfh. Symptoms characteristic at these growth stages include wilting of plants during the day with leaves eventually turning yellow-brown-gray and remaining on the plants. Also, look for a brown stem lesion that goes from the soil line upward about 4-6″. Some of these plants are also snapping off at the soil line. For those experiencing Phytophthora this year, future management includes:
- Using resistant varieties including a combination of good partial resistance and an Rps gene. Partial resistance alone will not be as effective during early growth stages or under high disease pressure.
- Cultural practices include anything that can improve soil drainage and compaction.
- Seed treatment fungicides containing mefenoxam or metalaxyl should be used and you may need to consider a higher rate of them.
Regarding corn diseases, bacterial leaf streak (BLS) has greatly increased on more

Bacterial Leaf Streak (BLS) in corn. Lesions are elongated and skinny staying between the leaf veins, similar to gray leaf spot (gls). However, leaf margins are wavy and diagnostics under the microscope show the presence of bacterial streaming from the leaf veins. With gray leaf spot, there will be the presence of fungal spores. Thus, the importance of correct diagnosis when considering fungicide applications.
susceptible hybrids since rain events. Early lesions can look very similar to gray leaf spot, so it’s important to correctly identify the two. The margins of BLS are wavy vs. those of gray leaf spot are more blunt. Both can have yellow margins when backlit by the sun. Fungicides are not effective against BLS and hybrids do vary in their tolerance to this disease. It’s important to scout fields as we may see an increase in fungal diseases due to the humidity, leaf wetness, and recent rain events. Southern rust has taken awhile to develop in the southern U.S., which is somewhat unusual, yet many states have been in drought this year too. As of July 5th, southern rust has been confirmed in Georgia with one suspected sample in a Missouri county. You can watch the map at: http://ext.ipipe.org/ and follow @corndisease on Twitter for the latest on corn disease findings in the U.S.
Trees: With numerous wind storms, the following resource has a lot of great information regarding pruning storm damaged trees correctly and questions to ask tree care services regarding tree pruning: https://go.unl.edu/94fm.
Agronomy Youth Field Day: All youth ages 9-18 years old are invited to the 3rd Annual Agronomy Youth Field Day. Youth will have exciting educational experiences while discovering Science & Agronomy/ Irrigation / Mechanized Agricultural careers for producing Nebraska crops! The field day will be held Wednesday, August 8 from 9 a.m.-3 p.m. at Nebraska College of Technical Agriculture Educational Center in Curtis, NE.
Hands-on activities (for all age levels) will focus on pest management, equipment technology, crop growth, soil management, precision farming & center-pivot irrigation technology. Several Nebraska Extension Cropping & Water Systems and 4-H Youth Development Educators along with Nebraska College of Technical Agriculture in Curtis Agronomy / Ag Mechanics Department professors will be sharing the researched based information with the students.
Participants will gain important life skills while discovering the science behind producing Nebraska crops. The six-hour field day is a great opportunity for ALL the youth to learn more about the agronomy industry and increase their basic understanding of science, ag literacy, a technology & STEM while exploring careers. Parents/Adults are welcome and lunch will be provided.
Reserve your spot today by registering online at: https://go.unl.edu/agronomyyouthfieldday by August 3, 2018. For more information (or if trouble with registration) contact Nebraska Extension Frontier County at 308-367-4424 or email 4-H Educator Kathy Burr at kathy.burr@unl.edu.
JenREES 7-1-18
Last night brought much-needed rain and grateful for that! From driving today, also saw some crop damage due to flooding, hail, and greensnap. So sorry for those of you most affected by greensnap and hail!
Last month I focused on counting my blessings-which are many! One has been the wonderful rains we’ve received at critical times of being so dry. The crops overall are beautiful right now regarding overall color and especially soybean weed control! Another blessing has been the opportunity to serve people in several counties the past 2+ years. I’m grateful for the extra time to serve my former area while also getting to know people in my new one! Grateful that relationships can be maintained and built regardless of where a person works or lives! I’m also grateful that we’ve been able to hire an individual who I believe to be a good fit for the Clay County Crops/Water Educator position with accountability region of Nuckolls, Thayer, and Fillmore counties. Michael Sindelar begins this new role on July 2. Michael conducted graduate research at South Central Ag Lab (SCAL) near Clay Center, so he is familiar with the area and with SCAL. His major advisor was Dr. Humberto Blanco, UNL Soil Scientist, and one of their projects was looking at soil impacts on corn residue removal and any impacts of adding cover crops into that system. I asked Michael to provide a brief background so I could introduce him to you.
“Hi, I am Michael Sindelar, the new cropping and water systems educator based out of Clay Center, Nebraska. I was born and raised in Lincoln, Nebraska. However, I was exposed to agriculture at a young age as my father would take me to the family farm located near Richland, Nebraska in Colfax county to “help” with the farm work. I joined the Navy in 2005 and served until 2010. I was a cryptologist collective (CTR) and worked in military intelligence. I was stationed out of Hawaii for my enlistment. I had the opportunity to see parts of the pacific and spent one year deployed in Afghanistan where I collected intelligence and conducted combat operations. After having fun for a couple of years I got my act together and earned a bachelor’s degree in Agronomy from the University of Nebraska. This spring I completed my master’s degree in Agronomy with a specialization in soil and water science from the University of Nebraska. I spent most of my master’s degree studying how changes in soil management affect soil water storage, recharge, and heat as storage and transfer through the soil. I look forward to starting my new position on Monday. I sign most of my emails using V/R which is a carryover from the military meaning very respectfully.”
There will still be a transition time of various projects currently underway with July 4 this week and Clay County Fair the next. Please be sure to introduce yourself to Michael when you see him!
When I transitioned to York/Seward a few years ago, I wrote a column entitled “Blessed”. I’ve been blessed to serve the people of Clay/Nuckolls/Thayer/Fillmore Counties a few extra years. And, I will always be grateful for relationships built and the opportunity you gave me entrusting me to help you with diagnosis and farming decisions! I hope you will also give Michael that same opportunity as he begins in this new role!
Tree Branches: Many of us had tree branches down again after the winds. After the last event, a few farmers mentioned to me that it’s frustrating when town people dump their branches in their farm ditches leaving the farmers to pick them up. So, while it’s only common sense and respectful to not do this, I said I’d mention to please not do this (although I’m uncertain if they would be reading my column)!
Glyphosate Resistant Palmer Amaranth Field Day: View field demonstrations and hear from experts at the Glyphosate-Resistant Palmer Amaranth Management Field Day Wednesday, July 11 at Carleton. The event is free and will be held from 8:30 a.m. (Registration) with program from 9 a.m. to 1 p.m. Keynote speaker will be Aaron Hager, associate professor and Extension weed scientist at the University of Illinois at Urbana-Champaign. He will speak on the biology of Palmer amaranth and current research on its control in corn and soybean, including in new technologies such as Xtend and Enlist soybeans. Populations of Palmer amaranth in Nebraska have been found resistant to glyphosate, atrazine, HPPD, and/or ALS herbicides, said Amit Jhala, field day coordinator and Nebraska Extension weed specialist. Demonstrations include:
- How row spacing and herbicide programs can affect glyphosate-resistant Palmer amaranth control in Roundup Ready 2 Xtend Soybean;
- Management of Palmer amaranth in: Balance GT/Liberty Link Soybean (resistant to isoxaflutole and glufosinate) and Enlist E3 Soybean (resistant to 2,4-D choline, glyphosate, and glufosinate;
- Critical period of Palmer amaranth removal affected by residual herbicides in Roundup Ready 2 Xtend Soybean.
These in-field demonstrations and research projects were funded by a grant from the Nebraska Soybean Board. Register online at http://agronomy.unl.edu/palmer to ensure appropriate meals and tour rides. Three Certified Crop Advisor (CCA) credits will be available for attending. If there are questions about registering, please call 402-472-5656. Directions: From Geneva go south on Hwy 81 for 14.6 miles. Turn west onto Hwy 4 and go 5.3 miles. The field day will be on the south side of Hwy 4 between C Street and Renwick Street in Carleton. (GPS: 40°18’24.7”N 97°40’29.0”W). Partial funding for this field day was provided by the Nebraska Soybean Checkoff and Nebraska Extension.
JenREES 6-24-18
Crop Update: What a blessing to have rain this past week! Grateful for how it provided much needed moisture into the top two feet in many cases. Updated soil moisture status will be at http://jenreesources.com. Some in our area and in other parts of the State received wind, hail damage, and flooding to crops. This week’s CropWatch at http://cropwatch.unl.edu shares information for those situations. A few summarizing points: for those with greensnap or with severe hail damage, you may wonder what potential yield may be based on your planting date and current plant stand. The following chart from Iowa State University and explanation of how to understand it may be helpful: https://crops.extension.iastate.edu/cropnews/2009/05/assessing-corn-stands-replanting.

Source: Iowa State University
For those with flooding, corn in the V7-10 leaf stage can survive for about 7-10 days in flooded water. Temperatures above 86F can result in greater stress on those plants than if the temps remain cooler than that during that time. Another consideration for the future, it’s not uncommon to find a disease called ‘crazy top’ of corn when the tassels begin to emerge. We’ve seen this the past several years where creeks or areas along waterways or field edges were ponded. There’s nothing you can do to prevent this.
For those with hail damage, damage from V7-10 leaf corn can result in a number of situations depending on the severity of hail. Minimal yield loss is assumed for leaf damage in crop insurance charts. Final plant stands will be important which will account for broken off plants that don’t recover. Stem bruising also isn’t factored in. For corn, bacterial diseases tend to be my larger concern at these growth stages. Bacterial top rot is one in which the plant dies from the top down and has a strong odor to it and creates a soft, slimy mess. Goss’ wilt is another concern-particularly systemic Goss’ wilt. You can check for this if you have a dying plant that doesn’t have a soft rot by taking a
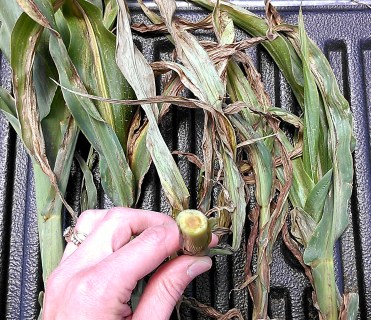
Cross-section of stem showing systemic Goss’ wilt in the discolored vascular bundles.
cross section of the stem and looking for discoloration of the vascular bundles. You can also send plants like this to the Plant and Pest Diagnostic Lab in Lincoln for confirmation.
Regarding fungicide use on hail damaged corn, Iowa State and the University of Illinois did studies finding similar results. Both found no statistical difference in applying a fungicide vs. the untreated check in spite of small numerical differences. Regarding timing, the Iowa State study simulated hail damage at tassel and applied fungicide an average of 3 days and 8 days post-hail. There were no statistical differences on yield of the timing of the applications either. They did find statistically less fungal diseases in the hail-damaged plots vs. the non-hail damaged plots and speculated it was due to more air flow and less leaf area available for disease to occur. I have observed that fungicide can help with stalk strength and maintaining whatever green tissue remains when we had the 2013 hail storm in Clay County at brown-silk to blister corn. But this early, it’s hard to justify a fungicide application based on the data that’s available. If you’re interested in testing this for yourself, the following is an on-farm research Fungicide Protocol for Hailed Corn and Soybean.
For hail damage on soybean, many of the beans are at flowering or approaching flowering. Again, stem bruising isn’t counted in crop insurance assessments. I haven’t really observed bacterial or other disease issues necessarily from stem bruising in soybean. What tends to be more of an issue is those plants hardening off and becoming brittle to walk through. For soybeans, the blessing is that often new buds form and you will see increased branching which can help with canopy closure…it just can hurt right now when soybeans were already near canopy and we’re trying to reduce additional inputs for weed control. Things to consider are that pods may be closer to the ground from this increased branching and you may need to harvest earlier to help with getting beans that become brittle before snapping off in wind storms. I leave plant stands of near 60,000 plants/acre based on our soybean pop studies that received hail damage. If you want to prove any replanting differences to yourself, you may wish to consider the following Soybean Replant Protocol. We’d recommend waiting on herbicide apps till some new growth occurs, which is difficult when I’ve watched palmer essentially be not affected by hail and put on two new leaves within a few days in the past. Last year we started making herbicide apps 5-7 days post-hail. Additional hail resources are at a new resource called ‘Hail Know’ at: https://cropwatch.unl.edu/hailknow. There’s a lot of info I haven’t transferred to this site yet…but you can view photos and comments on hail recovery at numerous growth stages over time at my blog under the ‘Storm Damage’ category: https://jenreesources.com/category/storm-damage-2/.
Last week I shared the following video regarding determining timing of off-target dicamba movement to soybean: https://youtu.be/rQid7-vX-TU. Sharing again with an increase in the number of fields that were experiencing cupped symptoms last week.
JenREES 6-17-18
This past week contained many off-target herbicide concern calls. Prior to Memorial Day I had made a note that post-herbicide applications to corn began in much of the area and anticipated phone calls to begin in about two weeks. Most of the conversations this week were more FYI to let me know they had soybean leaf cupping.
Here’s a few things to consider if you are having soybean leaf cupping.
- First, was a post-herbicide application made to your soybeans? If so, check for any potential tank contamination (Check out this CropWatch article: https://go.unl.edu/fnig). If not, check out this publication (http://ipcm.wisc.edu/download/pubsPM/dicamba2004.pdf) to determine if any of the criteria mentioned could possibly be contributing to the problem.
- Determine how old the plant is by asking when the soybean was planted and even better when it emerged. A soybean plant will produce a new node every 3.75 days.
- To determine the timing of damage, I count the total number of nodes on the plant to the last trifoliolate where leaf edges are not touching. The total number of nodes may differ in different parts of the field such as irrigated and non-irrigated especially after herbicide damage and drought-stress (Example 8 nodes irrigated and 6 non-irrigated). Take the number of nodes X 3.75 to get total approximation of plant age. Then count back on the calendar to determine approximate emergence date. If I use 8 nodes in this example X 3.75 = around 30 days ago the plant emerged.
- I then count the number of nodes to the very first damage I see on leaves (Example 3). Multiply this number of nodes times 3.75 and count forward on the calendar from emergence to that date. For instance, in this case, damage occurred around 11 days after emergence.
- I also like to count how many completely unfurled trifoliolates are affected (Example 6 trifoliolates). Take that number and multiply by 3.75 (Example 6 X 3.75= approximately 23 days ago the damage occurred).
- In this example, it worked to count either direction (from emergence and from current date) to determine approximate timing of off-target movement occurring. In all the situations I’ve looked at thus far, the timing goes back to around Memorial Day with post-dicamba herbicide applications applied to corn.
- Auxin-like herbicides affect only cell division. Thus, fully developed leaves (no longer expanding via cell division) are not affected even though they may be expanding by leaf cell enlargement. Only the tips of the newest exposed soybean leaves may experience damage to dicamba as they are still undergoing cell division. Otherwise, it can take 7-14 days for leaf damage from dicamba injury to appear on susceptible plants and damage will occur typically 4-6 nodes. This is because dicamba is also translocated once inside leaf cells. Thus it impacts cell division of the leaf primordia at the stem apex. We may not even see those leaves yet because they are still enclosed in the stem apex tissue.
- In a matter of weeks, affected fields can go from appearing to have minor damage, to looking really bad, to growing out of damage. It looks worst when those affected nodes push upward giving the field a grayish/white cast to it as the leaves become much reduced in size and are tightly cupped. Eventually the leaves will begin to look more normal again in time (as long as a second off-target movement doesn’t occur).
What can you do? Water via irrigation and/or rainfall is the best recovery tool for dicamba damage. Waiting is another. We’re blessed to grow indeterminate soybean in Nebraska which continues to produce nodes and leaves upon flowering which allows our soybean to grow out of damage.
- Wait till harvest to determine any yield impacts if there are areas impacted vs. those which aren’t. Otherwise, field-scale damage is difficult to discern yield impacts.
- You can talk with your neighbors/ag retailers regarding what they sprayed. In our area of the State, it’s often difficult to pinpoint the source of off-target movement with so many applying dicamba products to corn for palmer control often around the same time-frame. Now that post-apps to soybean are also occurring, that may also become a challenge. Of all the fields I visited last year, less than a handful of farmers sought any sort of compensation and those were more often due to tank contamination issues. If you wish to pursue that route, you need to file a complaint with the Nebraska Department of Ag.
- For future dicamba applications, check out these best management tips: https://go.unl.edu/97ok.
- For those of you reading this in a source outside of my blog, I created a video to hopefully be more visual and clear on understanding this method of diagnosing timing. You can check it out at my YouTube site: https://www.youtube.com/user/jenreesources.
Bagworms: It’s June and one of my top questions has been “Have I found bagworms yet?” Well, they’re now feeding and forming new bags on junipers and spruces. What you’re looking for are not the old bags at this point, but very small (fingernail size) new bags that move as the caterpillar is feeding and making the larger bag. This video from Backyard Farmer (https://youtu.be/05A2quj9nO4) does a great job of showing various stages of bagworms and sharing on control methods. Check it out!
Irrigation Scheduling Workshops: Steve Melvin, Extension Educator in Hamilton/Merrick Counties asked I share about upcoming irrigation workshops hosted by UNL and Upper Big Blue NRD. The program will focus on installing the equipment and making irrigation scheduling decisions using the data generated by Watermark sensors. The workshops will be held from Noon-1:30 p.m. on June 25th at the Corner Café, 221 Main St in Stromsburg and also at the same time June 28th at the Hordville Community Building, 110 Main St. The Upper Big Blue NRD will provide the lunch. The first presentation will be Installation of Watermark Sensors and Data Logger presented by Dan Leininger, Water Conservationist with the Upper Big Blue NRD. The second will be Deciding When and How Much Water to Apply Using Watermark Sensor Readings presented by Steve Melvin. The irrigation scheduling strategies presented in Steve’s presentation can be used with any soil water monitoring equipment data. More information is available by calling Steve Melvin at (308) 946-3843 or visiting https://extension.unl.edu/statewide/merrick/.
JenREES 6-10-18

Thank you to Tena with Faller Landscape in York and to all the youth who participated in our 4-H landscape design workshop and helped plant the Nebraska area! It will hopefully be beautiful for fair!
Crop Update: Rain continues to be spotty and windstorms have resulted in various levels of greensnap in some fields. Overall crops are growing and getting a decent canopy. It’s been interesting watching the radar on weather apps as so often they look like precipitation should be occurring yet that’s not always the case. Grateful for all of you who share crop updates-including things such as impacts on hay crops, pastures, etc. and for our farmers working with me on soil moisture monitoring. I was told this past week of the impact of our groundtruthing on the drought monitor; radar would make it appear we’re not as dry as we truly are. So just wanted to share that with you-that your input is important as we then share that input with those who work with the models and maps! I plan to get soil moisture sensors installed in non-irrigated fields in York, Seward, and Clay this week as well.
Soil Moisture Sensors Tips: With cultivating and hilling progressing, some are now looking at getting soil moisture sensors installed. If you utilize watermark sensors, the following are some tips I’ve learned.
Test sensors with wet/dry process to remove all air bubbles:
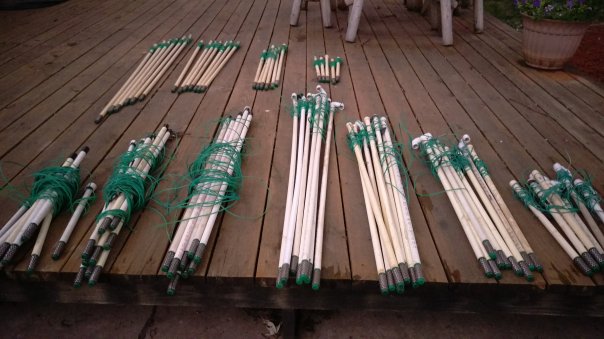
- First, make sure sensors read 199.
- Then, soak sensors for at least 24 hours. They should read 10 or less (Jenny’s note-I realize they may read this in a matter of minutes to hours but it’s our best practice recommendation to ensure all air bubbles are removed).
- If they don’t read 10 or less, gently rub any soil loose on them with your fingers (don’t use a brush) and allow to continue soaking for another 24-48 hours. If they still don’t read under 10, I don’t use them.
- Best practice is to then allow the sensors to completely dry out again to 199 to complete the wet/dry process. (Jenny’s note: I realize, due to time constraints, many sensors get installed once they have been soaking and never go through the complete drying process).
Installation:
- Avoid installing sensors in saturated soil conditions in clayey soils. Doing so allows a thin clay film to develop on the sensors which then affects readings .
- Prior to installation, the sensors should be soaked again and installed wet. The soaking process only takes a matter of minutes to get back to 10 or below. I carry the water bucket with sensors with me into the field.
- When soaking, water moves into the PVC pipe, thus it can take time for the water to drain providing accurate readings if not removed. Some sensors have a hole drilled in the PVC pipe above the sensor to allow water to drain. Otherwise, it’s important to remove the caps and tip the sensors over to dump any water that has accumulated in the PVC pipe during the soaking process. I then put the cap back on, take my hand and wet the PVC pipe with water so it pushes in easier. Some like to use WD-40 but my concern with that is it getting on the sensor affecting readings.
- Install all sensors where the sensor itself sets using an ag consultant tube (can be 12 or 18 inches). An ag consultant tube has a slightly smaller diameter that provides a tight fit for the sensor. Use a regular soil probe for the foot above that. For example, for 1’ sensor, I use ag consultant tube. For 2’ sensor, I use regular probe for first foot and ag consultant tube for second foot. For 3’ sensor, I use regular probe for first 2 feet and ag consultant tube for third foot. The reason for this is in clayey soils that are wet, there’s greater resistance to pushing in that sensor, so this is one way I’ve found which is easier for someone like me to push them in. (Jenny’s note: many have installed sensors with a regular soil probe through the years and that’s also fine. Just know that you may see more water run along side of tube before soil makes a tight fit around where sensor is located. I’ve just found less issues with this when I use the process described above).
- NEVER pour water into the hole or make a slurry. Make sure the sensor hits the bottom of the hole as air gaps can make the sensor readings inaccurate. Some people find it better to not remove the entire amount of soil for a specific depth and then push the sensor the rest of the way till the correct depth is obtained. I’m not always strong enough to do that so do what works for you as long as the sensor is at the correct depth and there’s no air gaps.
After Installation:
- Make sure to fill in any gaps around the sensor with soil and make sure there’s no soil cracks around the sensors.
- Make sure to mark each sensor and flag them well.
- Sensor readings should equilibrate with the soil within 48-72 hours but especially within a week.
- If a sensor starts reading really dry, before replacing it, I often remove it and reprime it in the field. This can be done by re-soaking in water for 1 minute or so till it goes back below 10 and then reinstalling in same hole. If it doesn’t go below 10, I replace it. If it reads strange the next week, I also replace it.
ET gages:
- A reminder to use distilled water in the tube and to fill the ceramic top when you’re also filling the main tube. I usually fill the ceramic top and wait for it to soak up a little then fill again.
- Prime the ET gage ensuring no air bubbles are in the second tube with the stopper. I always overfill the ET gage to help with priming and ensuring there’s no air bubbles.
- Excess water can be removed and also air bubbles can be removed by gently pulling down on the glass site gauge tube at the rubber base and releasing extra water from it. Air bubbles can also be released in this process. Place the site gauge tube back in place when you are at a water level between ‘0 and 1’. Then place one red marker ring on that beginning start level.
- I always plan to refill the ET gage when it gets down to ‘9’ on the site tube.
- The green canvas cover should be replaced at least every 2 years and be sure to dust it off and the white membrane below it.
In another column I’ll share how to use the two tools together for irrigation scheduling. All videos and charts with more information can be found at: https://water.unl.edu/category/nawmn. This is a checklist I made awhile back with Daryl Andersen which has more detail and could honestly be updated: http://www.littlebluenrd.org/pdf’s/forms/etgage_sensor_checklist.pdf but may also be helpful.
Tree Damage: Recent windstorms have caused for many downed branches and even some trees. When removing broken branches or dead branches, it’s important to prune correctly for tree health. Correct pruning of larger branches can often involve 3 cuts per limb. The first two cuts are made away from the trunk of the tree to remove most of the weight of the limb. The third cut is near the trunk itself at the bark collar ridge where the tree will eventually seek to heal. I like this Backyard Farmer YouTube video as a good visual of correct pruning: https://youtu.be/9cl0Qxm7npk. Pruning is best done in the dormant season of February and March. It’s best avoided in April and May when trees are putting energy into new leaves and in the fall as fall pruning can result in growth instead of the tree preparing for and going into dormancy. Some great resources with more information on proper pruning are: https://go.unl.edu/v9uf, https://go.unl.edu/gdb9, and this blog post https://jenreesources.com/2014/04/20/proper-tree-pruning.
JenREES 6-3-18
Crop Update: So grateful for some rain for much of the area last week! Updated soil moisture status at http://jenreesources.com. The crops are rapidly growing now as are the weeds. Some were seeing Palmer shooting heads at soil level already…last year we
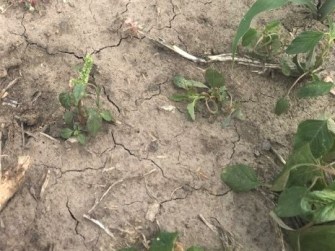
Palmer shooting a head at the soil surface. Photo courtesy Matt Kirchhoff.
didn’t see that till late July. Many have been in the process of postemergence herbicide applications. We revisited a CropWatch article regarding best management practice considerations for postemergence dicamba-based applications to corn based on the research that is available. Please see the full article with more explanation at http://cropwatch.unl.edu. Briefly, those practices include:
- Consider a quick irrigation (rainfast/irrigation timing based on label requirements for the product you’re applying) of only 1000 gal/ac to help reduce any potential volatility.
- Don’t use dicamba products in both corn and soybean to reduce selection pressure and resistance.
- Check for temperature inversions and wind speed. Temperature inversions can be tested by using Innoquest SpotOn® inversion tester and testing the temperature at 1 meter and 3 meters. If the temp is cooler at 1 meter than 3 meters, a temperature inversion is occurring and spraying is not recommended.
- Consider using the more restrictive RUP dicamba requirements regarding wind speed, boom height, etc. Also consider not using AMS with any dicamba product even though it is labeled for use in some of the corn dicamba products. This may result in you needing to increase the glyphosate rate to the highest labeled rate to increase efficacy. Amit Jhala will showcase research on efficacy of dicamba products with and without AMS at the South Central Ag Lab Weed Science Field Day on June 27.
Volunteer corn is also a major issue in many corn and soybean fields in the area and there’s two articles in CropWatch at http://cropwatch.unl.edu addressing this topic. A number of grass herbicides are available for control in soybean. The challenge is in the continuous corn fields. If you had glyphosate resistant corn last year and used a different technology such as Liberty or Enlist, you have some other options this year. For Liberty Link corn this year, two applications, each of 32 to 43 fl oz/acre, could be made. Remember that Liberty will NOT be effective if Roundup Ready + Liberty Link hybrid corn was planted last year. Regarding Enlist corn, Assure® II is the only grass herbicide labeled to control volunteer corn with this technology. It can be applied at 5 to 12 fl oz/acre in Enlist Corn for selective control of volunteer corn. Please be sure to read and follow all label requirements. A few farmers have also discussed their past experiences with cultivation, using either one or two passes and their concern about the soil moisture situation this year.
So how much yield loss can be anticipated from volunteer corn? Perhaps more than one would think with more loss occurring in soybean! Studies were conducted in several mid-western states at various densities including 3500, 5000, 7000 and greater volunteer corn plants per acre. To envision this, imagine 3.5, 5, and 7 volunteer corn plants respectively in 1/1000 of an acre (17’5” in 30” rows). Some fields this year have much higher densities than this! Clumps of corn impact yield more than individual plants.
UNL research found a volunteer corn density of 3500 plants/acre led to 10% yield reduction in soybean. Doubling the density to 7000 plants/acre led to a 27% yield reduction. South Dakota State University data revealed similar trends. A volunteer corn density of 5000 plants/acre resulted in a 20% yield reduction (12 bu/acre yield loss in 60 bu/ac soybean).
Clumps of volunteer corn in soybean led to greater yield loss as they were more competitive than individual plants. In the UNL study a density of 3500 clumps of corn/acre resulted in a 40% yield reduction. Researchers in Minnesota and Illinois also found increased competition with clumps of volunteer corn versus individual plants. Clumps of corn (7-10 plants/clump) were established at different densities. Depending on the location and year, soybean yield was reduced 1% for every 75-115 clumps/acre.
A recent UNL research study found highest yield reduction occurred when volunteer corn was left uncontrolled or when it was controlled too late at the R2 (full flower) soybean growth stage. The combined density at this greatest yield reduction was at 24,710 volunteer corn plants per acre plus 1,235 volunteer corn clumps per acre.
In corn, UNL research found a volunteer corn population of 3500 plants/acre resulted in a 2% yield reduction in corn. Doubling the density to 7000 plants/acre caused a 5% yield reduction. Clumps of volunteer corn led to greater yield loss as they were more competitive than individual plants. A density of 7000 clumps of corn/acre resulted in a 14% yield loss compared to a 5% yield loss with individual plants. So volunteer corn in general can be fairly competitive especially to our legume crops. It can also be a problem regarding harboring corn rootworm in soybean fields, reducing the advantage of the rotation from that perspective.
Also, an update on my soybean planting date demo at the fairgrounds: I wasn’t counting on rabbits! All the soybeans were reduced to stems below the point of recovery. So there is no demo but the groundskeeper preferred they took out my soybeans instead of his petunias 🙂 Will try again next year.
JenREES 5-27-18
Crop Update: Wheat is mostly in various stages of heading through pollination in this part of the State. The wheat scab risk prediction model (http://www.wheatscab.psu.edu/) was forecasting higher potential for scab in portions of Nebraska last week with a relax in the model this week due to higher temperatures and no moisture. Please keep an eye on your growth stages, the weather, and the model for risk of scab in your wheat.
Don’t have too much in the way of corn and soybean updates other than it’s good to see guys finishing planting and getting herbicide applications down. Waterhemp and palmer range in size from emergence to 4 inches from what I was seeing this past week.
Also a reminder to install irrigation scheduling equipment soon. It’s always easier to install earlier than when plants get larger! Check out this week’s CropWatch article at https://go.unl.edu/n0u0 which shares additional information about ET gage sites; reminders and tips for installing ET gages and watermark sensors.
Wheat and Field Pea Field Days: There are 11 upcoming wheat field days throughout the State, many of them coupled with field pea/pulse/cover crop field days as well. During the field visits participants will be able to learn more about different varieties of wheat, field peas, chickpeas and forages. Depending on the location, field visits will also include demonstrations of other specialty crops (lentils, winter canola, forages, cover crops) and effects that different agronomic practices (planting dates, seeding rates, fertilizer management, etc.) have on crop yield and yield quality.
Besides field visits, the field days will feature indoor sessions with a free lunch, a 30-minute networking session, and brief research updates. Networking sessions will allow participants to meet with seed, processing, and marketing businesses critical to pulse cop industry development in Nebraska. The research updates will include: Production and marketing of pulse crops, Incorporating cover crops in wheat and field pea cropping systems, and Wheat production – management for higher yield and grain protein. Area dates/locations are listed below and all flyers with additional information can be viewed at: https://go.unl.edu/vto8.
- May 30: Wheat Field Day, 6:30 p.m. at Fairbury, RSVP rpryor1@unl.edu
- June 12: Wheat and Pulse Crops, 9 a.m. at the UNL ENREC near Mead, RSVP nathan.mueller@unl.edu
- June 18: Wheat and Pulse Crops, 9 a.m. near Callaway and at North Platte (UNL WCREC), RSVP sstepanovic2@unl.edu
- June 19: Wheat and Pulse Crops, 8:30 a.m. near Grant (UNL Stumpf Wheat Center), RSVP sstepanovic2@unl.edu
- June 20: Wheat and Pulse Crops, 9 a.m. near Alma and Bladen RSVP sstepanovic2@unl.edu
Nebraska Field Pea Field Days are free, thanks to sponsorship by the Sustainable Agriculture and Research Education (SARE) in Nebraska, the Nebraska Environmental Trust, and the pulse crops seed and processing industry.
South Central Ag Lab (SCAL) Weed Science and Cover Crop Field Day: View demonstrations of new technologies and herbicides for weed control in corn, soybeans, and sorghum and effects of cover crops on soil health and pest management at the June 27 Weed Management and Cover Crops Field Day. It will be held at the South Central Ag Lab near Clay Center. The day begins with registration and rolls at 8 a.m., followed by weed management tours from 8:30 a.m. – noon, and cover crop demonstrations from 1 to 3 p.m. A free lunch will be served. In addition to the field demonstrations, Jim Specht, University of Nebraska-Lincoln professor emeritus, will presented on “Optimizing Soybean Planting Date, Seeding Rate, and Seeding Depth in Nebraska.” CCA credits will be available. Please pre-register at: https://agronomy.unl.edu/fieldday. The South Central Ag Lab is 4.5 miles west of the intersection of Hwy 14 south (to Clay Center) and Hwy 6 or 12.4 miles east of Hastings on Hwy 6. GPS coordinates: 40.57539, -98.13776.
Tours Include:
- Comparison of Herbicide Programs for Weed Control in Soybean including Roundup Ready 2 Xtend and Liberty Link Soybean, Examples of spraying the wrong herbicide on wrong soybean herbicide-resistant cultivar, Weed removal at different growth stages and yield impacts, and Understanding multiple herbicide-resistant soybean herbicide programs.
- Comparison of Herbicide Programs for Weed Control in Corn including glyphosate and glufosinate-resistant corn in addition to several new corn herbicides, response of white and yellow popcorn to various herbicide chemistries and off-target movement, control of volunteer corn in Enlist Corn, and Weed Control and Crop Response in INZEN sorghum.
- An Overview of the Effects of Cover Crops on weed suppression, pests (particularly wheat stem maggot) and beneficial insects. Cover Crop Effects on Soil Health, including changes in soil microbial communities and soil physical properties with a focus on cover crop root biomass.
JenREES 5-20-18
Crop Update: So grateful for rain and truly hope those who wanted and needed rain received it! An update to soil moisture profile as of 5/17/18 can be found at http://jenreesources.com.
A number of crop issues surfaced this week. One being root burn and wilted-looking corn seedlings from anhydrous ammonia applications with the dry winter/spring we’ve had thus far. Anhydrous ammonia can expand in soils 2.5-3” in all directions and potentially more in dry soils. Pivots were running to help with that and hopefully rain events will help non-irrigated fields that were suffering in this way. Another problem observed in some non-irrigated corn fields has been fomesafen carryover injury from products such as Flexstar, Reflex, Prefix, etc. These products have a 10 month planting window back to corn which is fine in most years, but dry conditions didn’t allow for the herbicide to break down in all situations from applications last June. This active ingredient is in Group 14 (PPO inhibitors) and the injury from this particular active ingredient is unique in that it causes yellow/brown striping of the veins themselves instead of interveinal chlorosis/necrosis. Seedlings most affected right now are found on field edges or wherever there was overlap of application. Hopefully corn should grow out of this injury in time. Herbicide carryover may be a something to watch for in soybean as well from other active ingredients. We also saw regrowth occurring on plants affected by wind/dust/debris damage but there are situations where replanting will be needed on endrows, etc. Roger Elmore has a photo gallery explaining regrowth in this week’s CropWatch at http://cropwatch.unl.edu.
Another situation that surprised me this year was finding seed corn maggot damage in

Seed corn maggot feeding on soybean seed. No insecticide was included in the seed treatment.

Seed corn maggot affecting soybean seedlings by feeding on cotyledons and hypocotyls. The brown grain-like structure in the bottom of the picture is a seed corn maggot that is pupating. These seeds did not have an insecticide in the seed treatment.
soybean. At first I was puzzled as the beans were clearly treated but then learned the beans didn’t have an insecticide added to the seed treatment. In scouting a number of fields, I’ve actually seen quite a bit of seed corn maggot damage, particularly in tilled fields and those with manure applied or those with cover crops that were green or where termination included tillage. I’ve also been surprised how many have told me they don’t use an insecticide seed treatment on early planted beans. We didn’t have any research in our early soybean planting studies without insecticide + fungicide seed treatment so we just automatically recommend both. Unfortunately this year we’re seeing what can happen without it with higher insect pressure in some fields. For seedlings with the insecticide seed treatment, I’m seeing light scarring on the cotyledons and hypocotyls but no maggot penetration. In fields without the seed treatment, I’m actually seeing penetration of the cotyledons and hypocotyls. The good news is that most of the maggots were also pupated, pupating or will be soon. But it is something to watch for, particularly in fields that have been tilled and especially if manure was applied or they were tilled and had a cover crop on them. They are not as attracted to no-till fields. Regarding stands, from my experience with soybean pops and stand loss due to crusting, hail, herbicide injury, etc., I keep stands of 60,000 plants/acre or more. It really stinks to talk about replanting anything right now with guys still trying to finish planting. If you choose to replant soybeans, consider proving it to yourself by planting strips and leaving strips. If you’re interested in that, I’d be happy to work with you. You can learn more about seed corn maggots here: https://crops.extension.iastate.edu/cropnews/2016/04/look-seedcorn-maggot-corn-and-soybean.
Wheat in the area ranges from boot to flowering. A couple of wheat fields I know of

Wheat field cut at boot stage for hay.
were taken for hay. For those still considering silage, check out the CropWatch article this week where Todd Whitney shares data on wheatlage (wheat silage): https://go.unl.edu/qkbr. The rainfall will greatly help our wheat right now. And, rainfall at heading to flowering makes me think about the potential for Fusarium Head Blight (scab). The wheat scab prediction monitor http://www.wheatscab.psu.edu/ is predicting medium to high risk for scab in Nebraska for the next 48-72 hours. Some years I feel the model is delayed in prediction, but I still feel it’s a good tool and resource. Scab is caused by Fusarium graminearum and is favored by warm (70-80°F temps), humidity, and rain events before and during flowering. Once wheat begins flowering (Feekes 10.5.1), many foliar wheat fungicides are off-label. In fact, recent research presented at the 2017 Fusarium Head Blight meetings shows that in general, strobilurin products can actually increase the presence of deoxynivalenol (DON) in wheat if applied at full heading (Feekes 10 or 10.5). Thus, your better fungicide options for preventing scab are Caramba and Prosaro and these products can also kill any fungal diseases present on leaves (such as powdery mildew, tan spot, and rust). These products aren’t 100% for scab prevention due to the variation of heading and flowering that occurs in so many fields. Better efficacy is obtained with more uniform plants which begins at seeding time. So I would recommend watching the growth stage in your fields, the weather, and the prediction tool regarding if you feel you need to treat any fields this year to prevent scab. Research has shown best efficacy to be obtained when at least 50% of the plants are at 1/3 flowering. Flowering begins with yellow anther sacs in the middle of the head with flowering continuing throughout the head from there. Once the pollen is released, the anther sacs turn white.
LBNRD Open House Public Hearing: The Little Blue Natural Resources District (LBNRD) is hosting a public hearing on May 29th from 6:30-9:00 p.m. at the Davenport Community Center in Davenport, NE. The purpose of the hearing is to provide information and receive testimony on proposed amendments to Groundwater Management Rules and Regulations. The hearing will be an open house format allowing individuals to ask questions of the NRD staff, look at exhibits, and offer testimony. The proposed rule changes and additional information can be found on the LBNRD website at: http://www.littlebluenrd.org/. Please contact the NRD with any questions at (402) 364-2145.
Not part of my news column: on a more positive note after mentioning all the crop problems, the lilacs in general were beautiful and smelled amazing!!!

JenREES 5-13-18
It was great to see so many fields of corn and even soybean emerging throughout the


area this past week! Also grateful for the rain we received in York and for those who received some in other areas. There are still areas who continue to miss rains and I remain concerned about the soil moisture situation. I have another soil moisture update this week at http://jenreesources.com if you’re interested in checking that out.
Thursday night/Friday morning’s high winds caused some damage with overturned pivots/corner systems and tree damage. We also saw newly emerged corn and even soybean cut off or
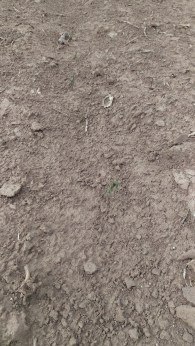
Corn plants were buried or cut off by blowing residue/soil. A few remaining plants in this area of the field can be seen.
buried due to blowing debris/soil, particularly in soybean stubble. It will be important to watch the plants in these fields the next several days. By late Friday afternoon, I was already seeing new growth occur, which is good. Typically, that has been the response in the past-new regrowth in corn as the growing point is still below ground. However, it will be important to watch the corn plants for any bacterial issues that may kill seedlings. One can also split open a few plants and look for a healthy growing point. Regarding the soybean, I have seen soybean lose cotyledons due to hail, crusting, freeze, and wind damage, and still produce a plumule at the top of the soybean stem. It’s just hard to know for sure what will happen so it’s best to watch the plants in the fields.
Wheat in Nuckolls, Thayer, and Webster counties ranges from elongation to near boot and is turning blue-gray from moisture stress. Wheat is a crop that I’m always learning about-it can look really bad (or really good) and then end up surprising a person regarding yield either way. Lower leaves


in fields are turning yellow-brown. Some of this is due to moisture stress while there’s also powdery mildew pretty thick in lower canopies of wheat that had more tillers. A few have talked with me about using the wheat for hay or silage and then potentially going in with short season corn, sorghum, or a forage crop. Our forage specialists would recommend that if the wheat variety has awns, it’s best to either take for hay or silage at the boot stage so the awns don’t cause issues with livestock feeding. Todd Whitney, Extension Educator in Phelps/Gosper counties, had worked with a feedlot using an awnless wheat variety. Because of the additional growth that occurs in wheat (and other small grains) from boot to full head elongation, they found biomass production may be increased 25% if the forage was harvested during the later pollination period.
Evergreen Trees: There’s also been a lot of evergreen tree questions. For those noticing spruce trees looking kind of yellow with early morning sunlight, spruce spidermites have been working hard with the cooler, dry weather. They tend to build populations in spring and fall. You can check for spidermites by taking a white piece of paper and banging the needles on it. Then look for the presence of tiny dark green to nearly black spidermites crawling on it. Rainfall is a great way to wash them off of trees as are strong streams of water (easier done with smaller trees). There are also a number of miticides available that homeowners can purchase from lawn and garden stores (look for products that say they can be applied to trees for control of spidermites). A great brochure on insect pests of evergreen trees can be found at: https://nfs.unl.edu/documents/foresthealth/insectevergreen.pdf.
Many of us also noticed our spruce trees turning red/brown/purple/yellow in color last fall. This is most likely a disease called needle cast of spruce and can be prevented by spraying trees now (mid-May) with a product containing copper sulfate. Regarding Ponderosa or Austrian pines, if you look closely at the needles and observe dark bands or rings on them followed by death of the needle either direction from the band, the tree problem is most likely due to a fungal needle blight like dothistroma or brown spot in Scotch pines. They can all be prevented by spraying a fungicide containing copper sulfate now. The following brochure on diseases of evergreen trees is really helpful: https://nfs.unl.edu/documents/foresthealth/diseasesevergreen.pdf. Sometimes the problem is finding the products listed on these brochures in our smaller towns as these brochures were developed in Lincoln. If these specific products aren’t available from your local lawn/garden store, box store, or coop, I would recommend looking at the products available and look for a product that says it is effective against needle blights on trees. Not all the products I’m seeing have copper as an active ingredient, but other fungicides are listed and the key would be the fact that the site (trees) and even better, the site with problem (trees with needle blights), is listed on the label.
We also continue to see pine wilt affecting our Scotch (short needles in groups of 2) and Austrian pines (long needles in groups of 2). Pine wilt disease is caused by the pinewood nematode that is carried within the gut of a long-horned beetle. The beetle is what creates the ‘shotholes’ often seen in bark of infected trees. The nematode is native to Nebraska, as are Ponderosa pines (long needles in groups of 2 and 3). This is why we don’t see the problem in Ponderosa pines but do in Scotch and Austrian, which are non-native to Nebraska. A tip, if you’re trying to distinguish Ponderosa vs. Austrian pines, anytime you see needles with a group of 3 it’s a Ponderosa. Pine wilt is caused by beetles carrying pinewood nematodes vomiting them into the water-carrying vessels of the tree (xylem). The tree senses the nematodes and essentially blocks water to those branches. Often you will observe a branch then perhaps a side of the tree and eventually complete death of the tree within 6-9 months. While I have diagnosed many samples of pine wilt, more often when I visit homeowners the tree problems are due to fungal diseases which occur on the needles.
Lawns: Please remember the importance of sweeping or blowing fertilizer and pesticide products back into the lawn instead of leaving them on sidewalks. Leaving them on the sidewalks puts them in contact with people and pets walking on sidewalks and moves them into storm water systems via rain that can eventually end up in streams. I’m also seeing a number of 2,4-D/dicamba products being sprayed around tree bases to kill weeds which is affecting the new growth emerging on trees. Consider applying a wood mulch layer around the base of trees to help avoid this situation in the future and be sure to read and follow all pesticide labels.
JenREES 5-6-18
What a beautiful weekend! It was a welcome change from the winds we received last weekend and early week. The high winds early in the week created difficult situations from many perspectives-soil loss, visibility, accidents, and drying out the seed bed.
Great to see several on-farm research plots going in and to have some new cooperators this year! I also started a very small soybean planting date demo at the York County Fairgrounds on April 24. A farmer on Twitter was encouraging other farmers to try planting a few seeds every week for yourselves in a garden plot and count the nodes and pods. Thought it was a great idea and will have it signed at County Fair regarding soil temps for first 48 hours and nodes. Thanks to Jed Erickson from Pioneer for the seed!
Rain events on May 1-2 allowed for some soil moisture recharge in the first and second feet in some locations. Unfortunately, the rainfall was still fairly spotty. We could really use rain overall for getting moisture back into drying seedbeds, activating herbicides, and settling dust. Pivots are running in some fields because of these factors. I provided an update on the locations I’m monitoring regarding soil moisture as of 5/3/18 on my blog at http://jenreesources.com. The farmers were interested in continuing this monitoring throughout the growing season this year, so will continue sharing as often as I can.
Wheat: Wheat’s joined in the area and ranges in height depending on soil moisture. For the past few weeks we’ve been noticing yellowing leaves. Some of that may have been due to cold temperatures. I was also seeing powdery mildew within the canopy of several fields I looked at. No rust has been observed yet in Nebraska fields. I also noticed tan spot in wheat on wheat fields. One concern was the cool weather has allowed for bird cherry oat aphids in area wheat. My concern is that they can vector barley yellow dwarf virus which is one we see when the flag leaf emerges. According to K-State, there’s not strong developed thresholds. They’re recommending if 20 or more aphids are observed per tiller with lady beetles observed on fewer than 10% of tillers, spraying may be justified.
Lawn and Garden Information: With this year’s cool spring, crabgrass preventers can still be applied the first few weeks of May. Germination begins with soil temperatures around 55F but prefers warmer soil temps. UNL Lawn calendars for Kentucky Bluegrass, Tall Fescue, and Buffalograss and all UNL lawn resources can be found at https://turf.unl.edu/turf-fact-sheets-nebguides. Mowing heights should be maintained at 3-3.5″ for the entire year. We also recommend just mulching clippings back into the lawn to allow for nutrient recycling. If you like to use mulch for your gardens, it’s important to read pesticide labels on products applied to your lawn. Some labels say it is not safe to use the clippings as mulch. Others say to wait at least three mowings before using the clippings as mulch.
Garden centers have been busy with the warmer weather and some have asked about temperatures for hardening off transplants. Kelly Feehan, Extension Educator in Platte County shares, “May is planting time for most annual flower and vegetable transplants. To avoid transplant shock and stressing young plants, wait for soils to warm up and take time to harden off transplants. Soils are colder than average this year so waiting to plant will be beneficial. And then, plants moved directly from a warm, moist greenhouse to windy and cooler outdoor conditions will be stressed by transplant shock. This can negatively affect plant growth, flowering, and vegetable production. Harden off transplants by placing them outdoors, in a protected location, for at least a few days before transplanting outdoors. Another way to harden transplants is to plant them in the garden, then place a cardboard tent or wooden shingle around them for a few days to protect them from full exposure to wind and sun. Planting young transplants on an overcast, calm day or during the evening also reduces transplant shock.” Specifically when it comes to tomatoes, it’s best to wait till mid-May otherwise “gardeners who plant earlier need to be prepared to protect tomato plants with a floating row cover or light sheet if cold threatens. To help tomato transplants establish quickly, begin with small, stocky, dark green plants rather than tall, spindly ones. Smaller plants form new roots quickly and establish faster than overgrown transplants. Do not plant too deep or lay tomato stems sideways. Although roots will form on stems below ground, this uses energy better used for establishment. Use a transplant starter solution after transplanting tomatoes to be sure roots are moist and nutrients are readily available in cool soils. Wait until plants are growing well before mulching or mulch will keep soils from warming and may slow tomato growth.”


